How to Write a Creator Invoice for Brand Deals (Step-by-Step)

Paul Osas

You just delivered the final video. The brand absolutely loves it. They send you an enthusiastic email saying, “This is perfect! Please send over your invoice, and we will get it processed.”
Panic immediately sets in.
You’ve never sent a professional invoice before. Do you just reply with your PayPal email address? Are you supposed to make a Word document? Do you need a special tax identification number?
Sound familiar?
Are you terrified of looking amateurish right at the finish line? Do you worry your hard-earned payment will get delayed because you missed a crucial accounting detail? Are you ready to confidently hit “send” and watch the money hit your bank account?
I’ll make it easy for you.
Writing an invoice isn't about complex math or having a corporate finance degree. It is simply a structured, organized request for your money.
Let’s get started.
Step 1: Understand Why the Invoice Matters
A massive mistake new creators make is assuming a brand can just Venmo them cash based on a handshake agreement.
Corporate brands cannot do this. They have accounting departments. To legally release funds from their bank account, they need a paper trail to prove to the government that they bought a service. Your invoice is that paper trail.
If you don't send an invoice, they physically cannot pay you. Whether you are operating as a freelancer or you've decided to set up a formal entity (check out our guide on the UGC creator LLC vs sole proprietor explained), providing an invoice is a non-negotiable step in how UGC creators get paid.
So how do you do it? Let’s build your invoice from the top down.
Step 2: The Essential Header Information
The top of your invoice needs to clearly state who is asking for money, and who owes the money. If this section is confusing, the accounting department will reject it.
Here is exactly what you need at the top:
Your Information: Your full name (or business name), your mailing address, your email address, and your phone number.
The Client’s Information: The brand’s official business name, their mailing address, and the name of the specific marketing manager you worked with.
The Word "INVOICE": Write this in large, bold letters at the top. Don't make them guess what the document is.
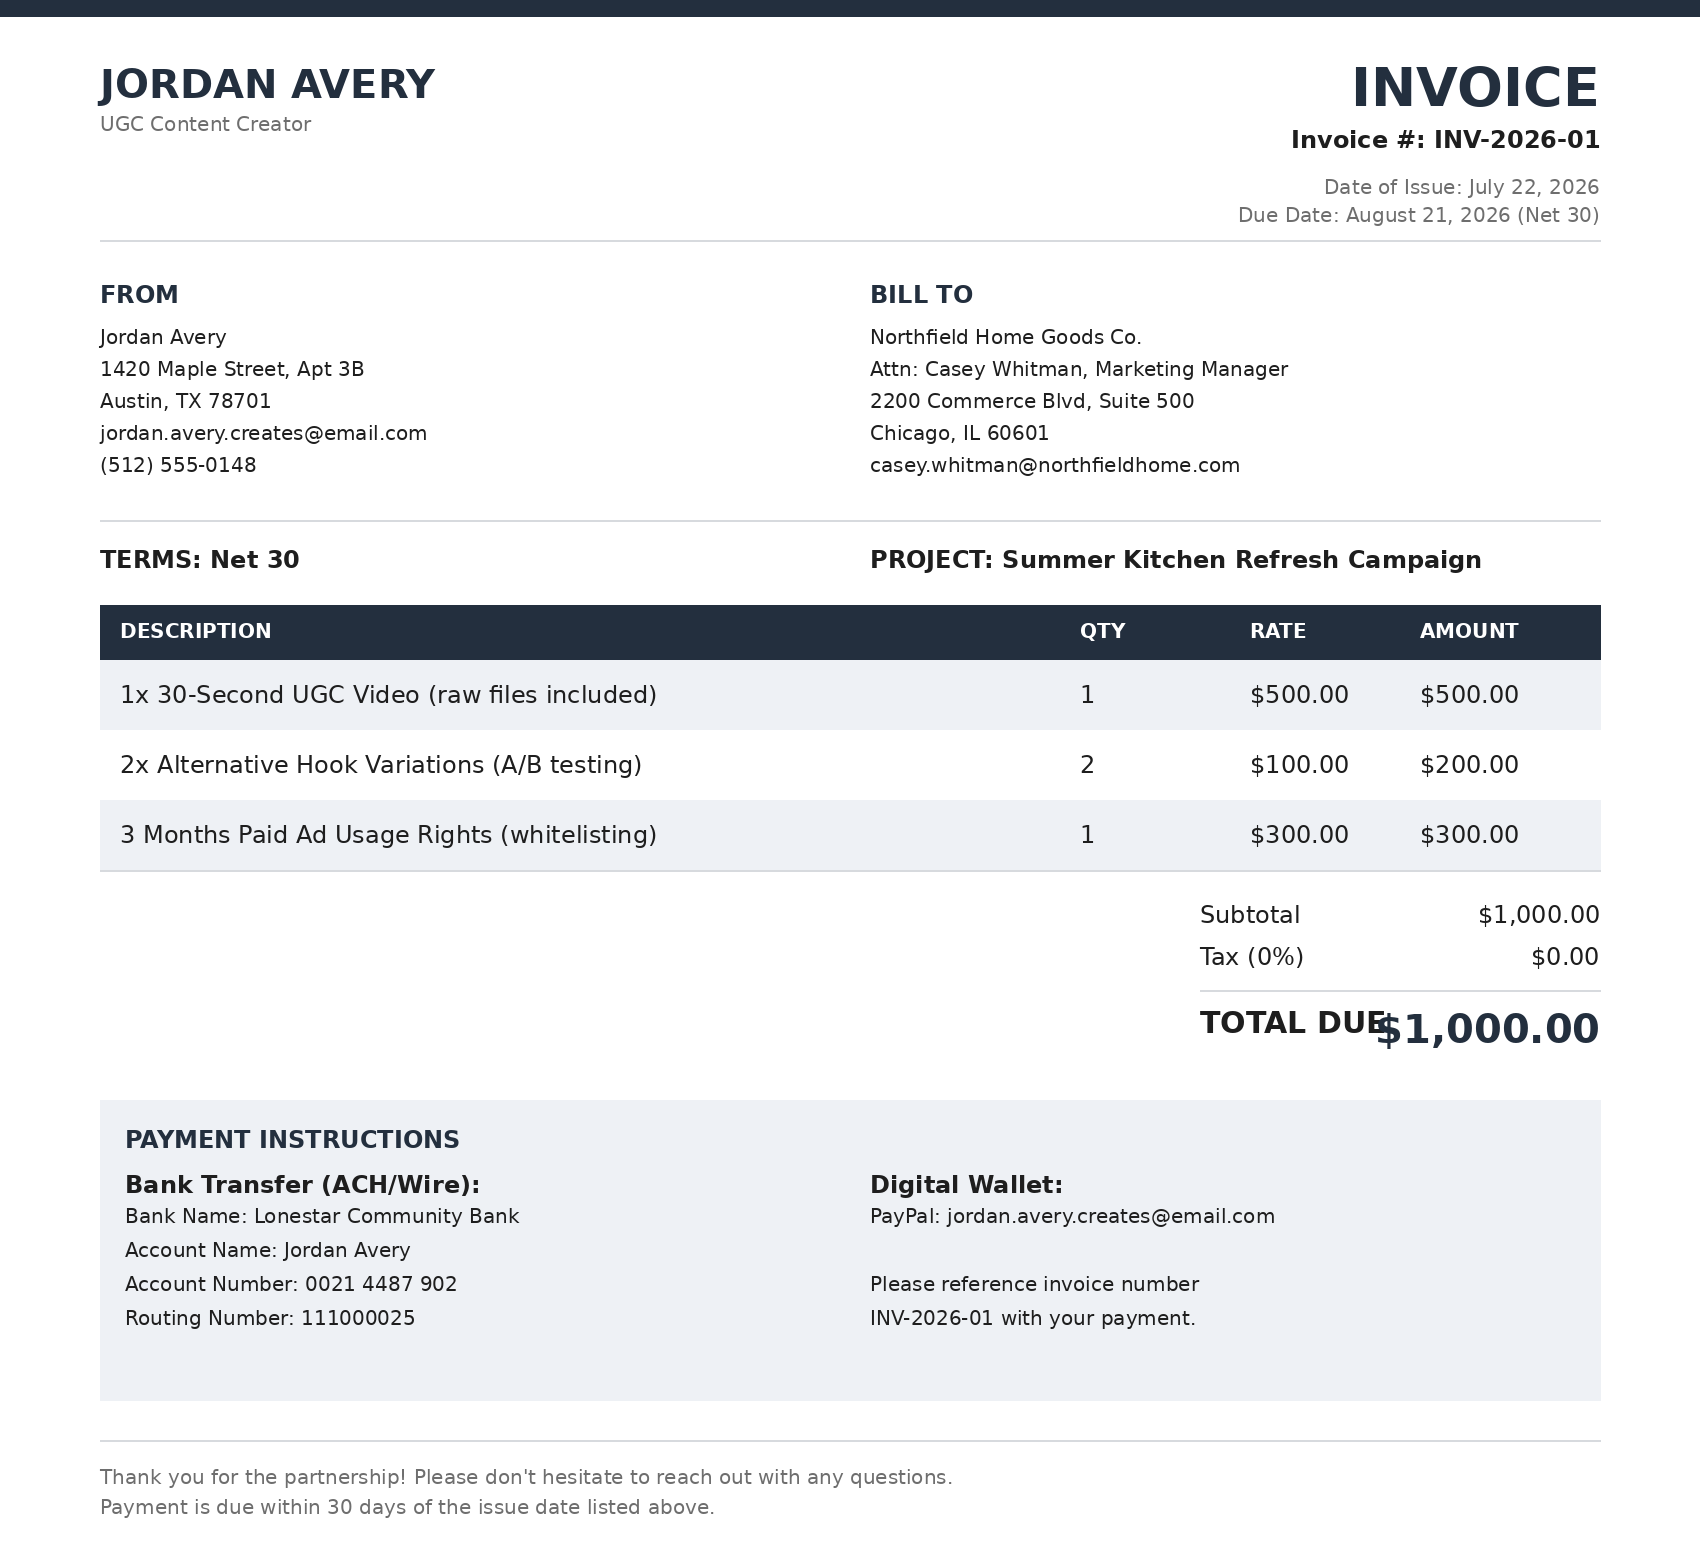
Invoice Number: Never send an invoice labeled "001." It makes you look like it's your first day on the job. Start your numbering at "1001" or use a date-based system like "INV-2026-01". Every invoice must have a unique number.
Dates: Include the "Date of Issue" (the day you send it) and the "Due Date."
Make sense? Now let's talk about the most important part: the money.
Step 3: Itemize Your Deliverables Clearly
When learning how to write a creator invoice for brand deals, this is where most beginners fail.
Do not just write "TikTok Video - $1,000" in the description box. You need to break down the exact value you provided. Your invoice should perfectly match the deliverables outlined in your UGC creator contract template.
By itemizing your services, you remind the brand of your full value. If you need a refresher on how to price these individual elements, review how to price UGC content.
Here is a brilliant example of an itemized invoice:
Item 1: 1x 30-Second UGC Video (Raw files included) - $300
Item 2: 2x Alternative Hook Variations for A/B Testing - $100
Item 3: 3 Months Paid Ad Usage Rights - $600
(Note: Never bury your usage rights. By breaking them out as a separate line item, the brand sees exactly what they are paying for. For more on this, read our ultimate pricing and licensing guide.)
Add these line items up, include any applicable taxes, and put the "Total Amount Due" in bold at the bottom.
Step 4: Set Crystal Clear Payment Terms
When do you want your money? You have to tell them.
In the corporate world, brands operate on specific payment cycles. The most common term is Net 30. This simply means the brand has 30 days from the date they receive the invoice to send the funds.
While it is frustrating to wait a month for your money, Net 30 is the standard industry practice. However, you can always attempt to negotiate "Net 15" or "Due on Receipt" during your initial contract phase.
Whatever term you agreed upon, state it clearly on the invoice. Write: "Terms: Net 30. Payment is due by August 22nd, 2026."
Step 5: Provide Exact Payment Instructions
The accounting department is ready to pay you. Where do they send the money?
Do not make them email you to ask for your banking details. Provide everything directly on the invoice document.
For Bank Transfers (ACH/Wire): Include your Bank Name, Account Name, Account Number, and Routing Number. If you are working with an international brand, you will also need to provide a SWIFT code. (Tools like Wise or Payoneer are excellent external options for receiving global creator payments smoothly).
For Digital Wallets: If you accept PayPal, list your exact PayPal email address.
Pro Tip: If you use a merchant processor like Stripe or PayPal, they charge a transaction fee (usually around 2.9% + 30 cents). If you are charging $1,000, you will only receive $968. You must clarify in your contract whether the brand is responsible for covering processing fees, or if you will absorb them.
Step 6: Choose the Right Invoicing Tool
You know what goes into the invoice. Now, how do you actually make it?
Please, do not build a chaotic table in Microsoft Word. You want to look like a premium creative agency.
Fortunately, there is incredible software available to handle this for you.
Free Accounting Software: Platforms like Wave Accounting or Zoho Invoice allow you to create beautiful, branded invoices for free. They even let the brand click a "Pay Now" button to pay via credit card.
Creator-Specific CRMs: If you use premium platforms, invoicing is often built right into the system.
Design Tools: If you want total aesthetic control, you can use a free Canva invoice template, customize it with your brand colors, and export it as a clean PDF.
Whichever tool you choose, ensure the final document looks polished. This is the last impression you leave with a client before trying to secure long-term brand partnerships.
Step 7: Master the Art of the Follow-Up
You sent the invoice. You waited 30 days. The due date has passed, and your bank account is still empty.
Do not panic. And do not send an angry, aggressive email accusing them of stealing from you.
95% of the time, late payments are not malicious. A brand manager simply forgot to forward your PDF to the accounting team, or the finance director was on vacation.
Send a polite, professional nudge.
“Hi [Name], I hope you’re having a great week! I’m just doing some end-of-month bookkeeping and noticed the invoice for our recent campaign (INV-1002) is currently past due. I’ve attached the original invoice here for your convenience. Could you let me know when this is scheduled for processing? Thank you!”
A friendly bump is usually all it takes to get the funds released immediately.
Get Ready to Get Paid
Your creator business thrives on cash flow. By standardizing how you ask for money, you remove the friction, anxiety, and delays from your workflow.
Set up your template once. Use a professional numbering system. Itemize your value based on your influencer rate card. And always send your invoice right alongside your final video files (learn how to organize UGC deliverables for brands so your handoff is flawless).
Once you master the business side of content creation, you can finally scale from 1-off UGC gigs to monthly retainers.
Ready to fill up your new invoice template with high-paying clients? Head over to PitchBrand today, access our verified database of decision-makers, and start landing the paid brand deals you deserve.